
- Syvizo API Management Platform
- Overview
- Getting Started
- Manage Users and Accesses
- Design APIs
- Publish API
- Collaborate
- Validate APIs
- Manage API Flows
- Flow Management
- API Flow Manager
- Policies
- Traffic Management
- Security
- Transformation
- Extension
- Insights
API Flow Manager
Log in to the platform and select “API Flow Manager”:
You will be taken to Project dashboard of the API Flow Manager and you can view the existing projects that you have access to.
You can open any of the projects by clicking “Open” or create a new project by clicking on “+ Create” on the top right.
To delete the project, click on the delete button
You can create a new blank project or create a project based on an OpenAPI specifications file.
If you navigate to API Flow Manager from API Design Studio, you will be taken to the project corresponding to the API Design Studio project if it exists. If the corresponding project does not exist, then a new project will be created automatically and you will be navigated to it.
The component structure is as follows:
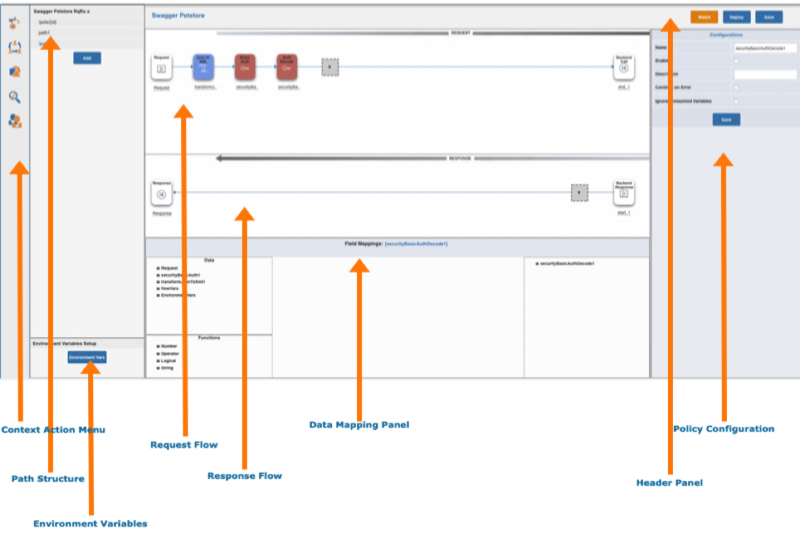
The left most menu bar is the context action menu:
![]() Takes user to the API Flow Manager component for the current project
Takes user to the API Flow Manager component for the current project
![]() Takes user to the API Collaborator component for current project
Takes user to the API Collaborator component for current project
![]() Takes user to the API Design Studio component for current project
Takes user to the API Design Studio component for current project
![]() Takes user to the API Validator component for current project
Takes user to the API Validator component for current project
![]() Open dialog to manage access for
Open dialog to manage access for
The menu panel next to context action menu is the API paths menu. You can click any of the paths to open the flow for the path in the canvas in the middle part of the screen.
Do note that the request and response flows are loaded for the path you click on.
The “Environment Variables” button on the lower left side opens the dialog box for setting the environment variables. These are the variables that are common to all the flows in a project, meaning, they are available and applied to all the flows in all paths. When you click on this button, a dialog box opens where you can add variables and edit their values.
The middle part of the screen has three parts. The first is the “Request Flow”. This is the panel where the request flow is developed. The part below that is “Response Flow” in which the response flow is developed.
The part below the Response Flow is Data Mapping panel. This is used to get data from various sources such as request, environment variable, flow variables and other policies in the flow path and set as input to further policies with or without processing with expressions and available functions.
Right most panel is Policy Configuration panel. The policy configurations are loaded on this panel for the policy card in request or response flow. Click on any of the policies in request or response flow to load the configurations for that policy.
This (right most) panel is also used to create the flow variable structure. To create the flow variable structure, click on the request or response flow panel outside the policy card.
The top most panel is the header panel and it contains buttons to save, deploy or watch the flow for a path.
The actions on the header panel are applicable only to the loaded flows. For example, if you click on ‘path1’ on the path menu, the flows for that path are loaded, you can update the flow and their configurations and perform one of the actions on header flow. If you click on save, then the changes made to the flows for the path are saved. Similarly, if you click on deploy, then the flows that are loaded gets deployed.
Flow development comprises of:
- Selecting and adding policies
- In some cases, the policies are added conditionally
- Configure the policies, meaning specify the properties of the policies that direct their behaviour at runtime
- Create data mappings
- Create Flow Variables and set and/or read their values
- Save and deploy the flow
These activities are done for request and response flow as needed.